

Calibration OrcaSlicer/BambuStudio print profile

Calibration OrcaSlicer/BambuStudio print profile
- Made to order — 3D printed after you buy
- Free shipping on orders over $25
- Quality checked before it ships
- Questions? Contact us · Returns
I wanted to thank @SteveHanov - this is his brilliant idea for calibrating prints, I just tweaked it a bit....
I've corrected a miscalculation and adapted the calibration model to a 5mm diameter drill bit - it's more accurate than a screw head.
***********************************************************************************************
What to do with this model?
This is a model for calibrating prints from a specific filament (or rather for calibrating silcer settings) - it is not a printer calibration.
In other words, if you need a functional print where dimensional accuracy to the model is important, then this calibration is for you.
This calibration allows you to calculate:
- the shrinkage value of the felt,
- x-y correction,
- hole correction.
Personally, I use Oracaslicer (BambuStudio has the same parameters available) there all three values are included in the parameters:
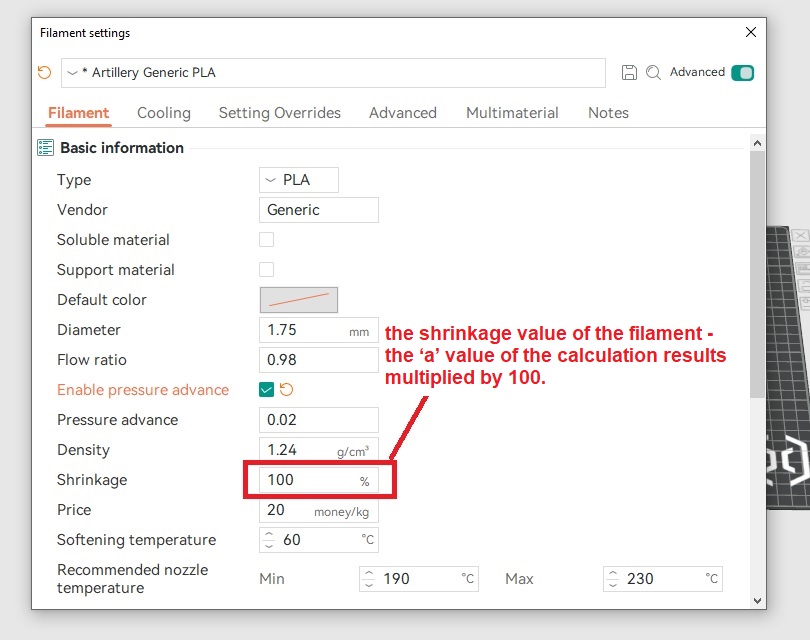
The shrinkage value in the parameters of the filament.
The x-y correction and hole correction in the print parameters.
-----------------------------------------------------------------------------------------------------------
On the model, the -4 and +4 mark the values of the extreme holes:
-4 o means 4.6 mm (i.e. -0.4 mm from the diameter of the reference hole)
+4 means 5.4 mm (i.e. +0.4 mm from the reference hole diameter)
So:
- if the drill enters the holes in the +4 direction when measuring - the values are subtracted.
- if the drill enters the holes in the -4 direction when measuring - the values are added.

----------------------------------------------------------------------------------------------------------
How it works:
1. Print the model.
2. Open link with calculations for our model.
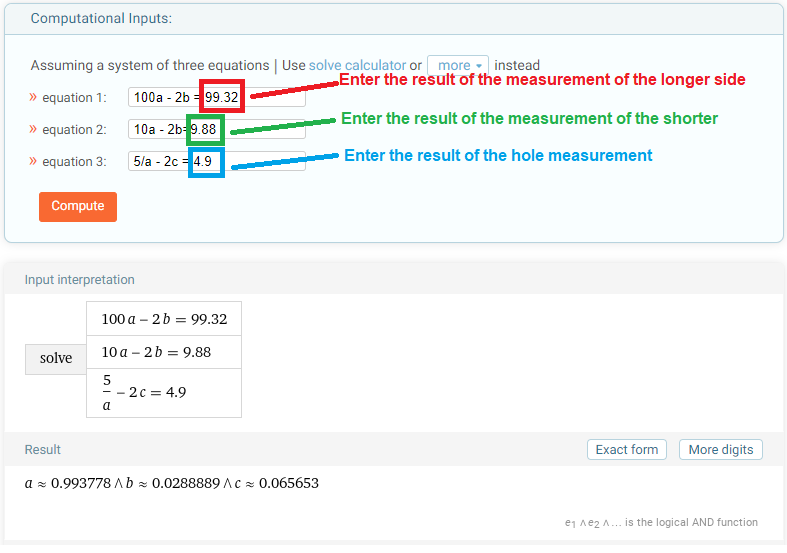
3. Measure the longer side and enter the result in the calculation area: ‘99.32’.
4. Measure the shorter side and enter the result in the calculation area: ‘9.88’.
5. Insert the 5mm drill bit into the smallest hole it will fit into:
The middle hole is the reference hole and is assumed to be the zero hole.
Example1 ===
For example, if you place a 5mm drill three holes higher than the center hole (in the +4 direction), enter a value of 4.7 in the "4.9" calculation point.
The holes differ by 0.1 mm, so the reference hole is 4.7 mm because you only put the drill into the third hole.
Drill+0.3mm=5mm
Drill=5-0.3=4.7

Example2 ===
For example, if you put the drill into 1 hole above the reference hole, you should enter in
4.9 in the place of ‘4.9’.
Drill+0.1mm=5mm
Drill=5-0.1=4.9

Example3 ===
For example, if the drill has already entered the second hole, but in a direction of -4 from the centre hole, a value of 5.2 should be entered into the calculation instead of "4.9".
Drill-0.2mm=5mm
Drill=5+0.2=5.2

6. Once the measured values have been entered:
1) Switch on "Compute".
2) Then "Approximate form".
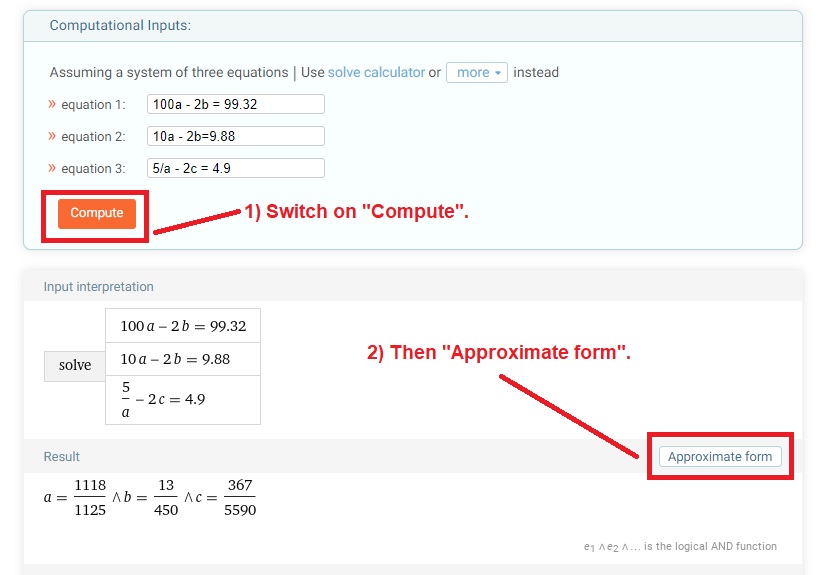
We have now received the results in a form that we can already enter in Oracslicer.

7. After the measurements and calculations, the results for the values a, b, c are entered in Orcaslicer/BambuStudio respectively:
- the shrinkage value of the filament - the ‘a’ value of the calculation results multiplied by 100.
For example if a≈0.993778 then the shrinkage value will be: 99,3778 %
- x-y correction - value ‘b’ of the calculation results.
- hole correction - value ‘c’ of the calculation results.
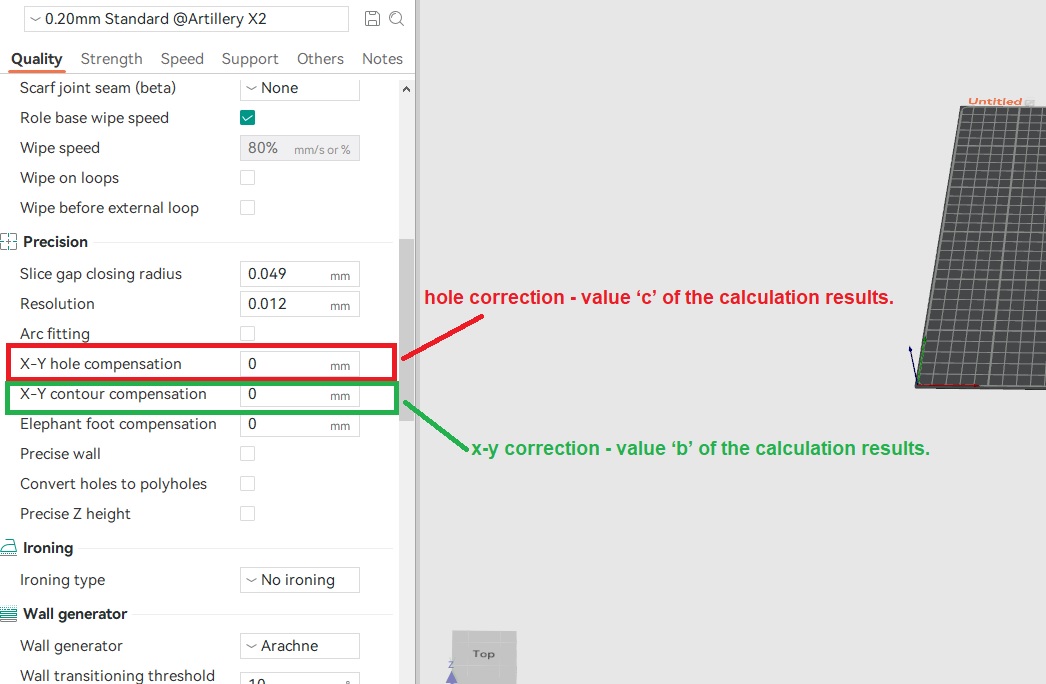
In other slicers these parameters may be described differently in not all may be hole correction.
8. Having entered the above parameters into Orcaslicer/BambuStudio for our filament, we can print the calibration model again.
A well calibrated model should be 100x10x5mm and the 5mm drill should fit tightly into the centre hole.
***********************************************************************************************
|
CONCLUSION 💚💚💚If you enjoyed the project please like it.💚💚💚 Post your makes and let me know how it works out for you. If anyone has any comments about them - I'd be happy to listen and improve the models. |
Design by Mario_L on MakerWorld (license: BY-ND).