

Interactive lamp-I LOVE YOU


Interactive lamp-I LOVE YOU
- Made to order — 3D printed after you buy
- Free shipping on orders over $25
- Quality checked before it ships
- Questions? Contact us · Returns
Interactive lamp - I LOVE YOU – Arduino-Powered Touch Lamp for the Modern Space
Immerse yourself in the aesthetics of light with my 3D-printed, Arduino-powered lamp. This inaugural creation of mine combines the elegance of design with the precision of engineering, inviting you to experience the warm aura of the digital age. With a gentle touch on the innovatively integrated touch sensor, the lamp comes to life, cycling through a spectrum of lighting scenarios—from soothing color gradients to dynamic light plays, adding an extraordinary atmosphere to any room. It is thus a dreamy gift for your loved ones.
Construction Guide – Your Path to Your Own Interactive Lamp:
Certainly, if there are any aspects of this lamp project that may seem unclear to you, please let me know. This lamp is an old project of mine, and I can adjust the description accordingly if needed. Thank you! :D
The lamp is based on an Arduino UNO, which serves as the heart of this project, and a WS2812B LED strip (I recommend 30 LEDs per meter), which provides the diverse color display. For power supply, you will need a 5V DC connector and a simple switch to turn the lamp on and off.
Here is a detailed breakdown for the assembly:
-
Touch Sensor Assembly: Attach aluminum foil to the underside of the lamp base to create the touch sensor. This should be placed centrally on the lampshade to make the entire surface touch-sensitive.
-
Electrical Connection: Connect the Arduino UNO to the LED strip and the touch sensor according to the attached circuit diagram. Make sure to place the connections correctly to ensure safe operation.
CAUTION!: All electrical components should be connected in parallel. The Arduino should only process and send the appropriate electrical signals. The switch should be connected in series with the 5V power supply.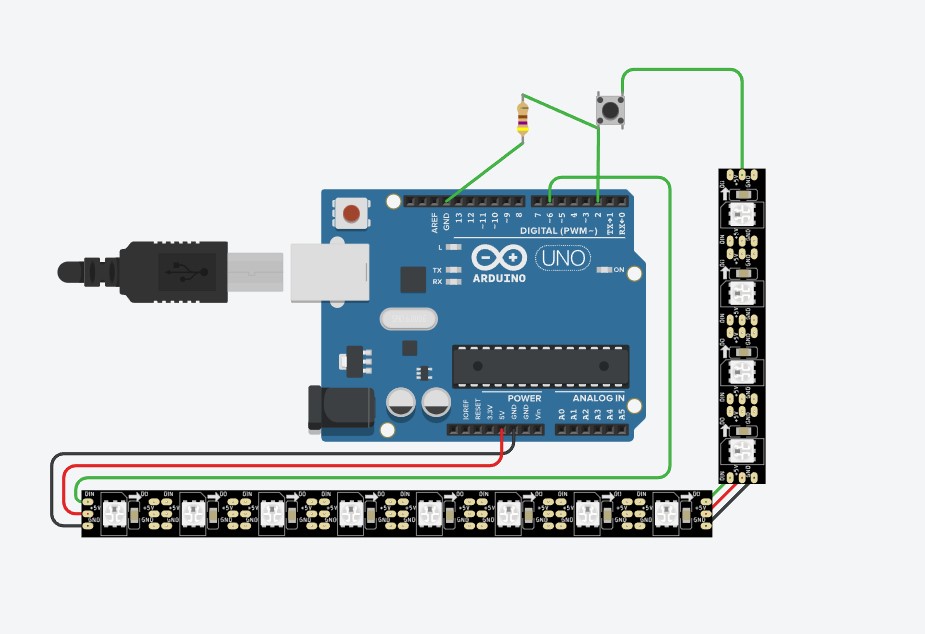
-
Programming: The Arduino program already contains pre-installed programs that generate various lighting scenarios. You can adjust the number of LEDs in the code to match the size of your lamp. The brightness of the lamp can be adjusted by pressing and holding. The program is just an example and can be customized as desired.
|
#include // Digital IO pin connected to the button. This will be driven with a #define PIXEL_PIN 6 // Digital IO pin connected to the NeoPixels. #define PIXEL_COUNT 81 // Number of NeoPixels // Declare our NeoPixel strip object: void setup() { void loop() { // Fill strip pixels one after another with a color. Strip is NOT cleared
|
Although this project may be some time ago, the joy of creating and sharing remains unchanged. I am currently developing a new generation of this lamp that uses images instead of text and is equipped with additional interesting features.
Join me on this innovative journey and be the first to know about my latest creations.
Follow me to not miss any updates.
I am always open to new ideas. So, if you have new or different ideas, feel free to share them with me!
Design by chris on MakerWorld (license: BY-SA).