

Kids Logic Game (fusion360)


Kids Logic Game (fusion360)
- Made to order — 3D printed after you buy
- Free shipping on orders over $25
- Quality checked before it ships
- Questions? Contact us · Returns
Summary:
A game to stimulate your kids logic skills by asking him to match a given pattern by moving pegs on a board.
Model Description:
Although these kinds of games already exist, it was reimagined as a 3d variant with some personal ideas. It's meant as a fun, pedagogical,... way to interact with logic problems. The idea is that you present your child with a card depicting a certain position for each peg and that he tries to recreate it by moving the pegs around. He will then have to think of the order to use since pegs can't pass through each other and that there are only a few storage spaces available at any given time.
I also made a program to generate all the possibilities (all the cards for this game) in which the toy can be, to be used as objective cards for the child. By using some math we can calculate how much there should be, there are 12 pegs and 4 colors. There are overlaps since we don't distinguish pegs of the same color. This is thus a multinomial combination of the form :
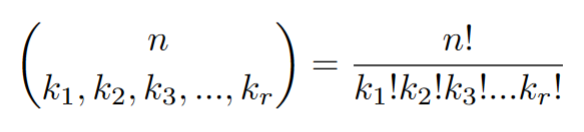
In this case we obtain:
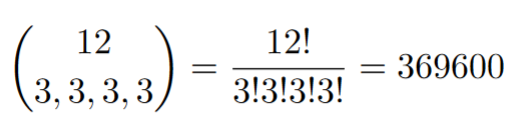
You can find all cards here: cards.zip, but, since they are 369 600 possibilities, you clearly should only select a subset for your child.
Printing Information:
To print this model, you should first split it to its parts, however, due to some strange behavior of fusion360, it isn't straightforward (I added a split to fix an issue).
First, split it to its objects, the model will split into 2: the baseplate and the rest. Move the baseplate away and split the rest once more to obtain all pieces properly isolated. Don't split the baseplate, otherwise you will transform internal holes into separate models that will get moved.
- For the pegs (12x):
- Print the heads flat on the printbed, a brim isn't needed and is even a hindrance since smooth borders are nicer for grabbing
- Print the connector vertically, the size of the hole isn't critical as it is only there to relieve pressure when inserting the piece.
- For the backplate:
- Flexibility is your enemy since it could allow the pegs to escape.
- Print the plate flat on the printbed and use brims (internal and external ideally) to avoid it lifting from the bed, the flatter the better.
- For the borderpieces (2x2):
- Print each piece with the railing up, use tree supports for the flat borderpieces and regular support for the curved ones. (supports will generate inside the connector holes so pry them out before trying to connect the border.
Assembly Information:
You will need 12 pegs, 2 flat border pieces, 2 curved border pieces and a backplate.
For each peg, assemble one side with the connector, then connect both sides through the backplate (the fit is tight since it isn't meant to be taken apart).
Once you have the backplate with the 12 pegs inside the railings, put a curved borderpiece on one side then slot both flat borderpieces and finally complete the border with the last curved piece. The border should be tight once fully assembled.
It is also important to note that the 3d printing process is not food safe even if the printing material used is labeled as such, therefore it is recommended to coat any 3d print which comes in contact with food, mouths, … with for example a food safe epoxy resin.
Design by mosselini1 on MakerWorld (license: BY).