

Modular Filament Drawer System (Bambulab friendly)


Modular Filament Drawer System (Bambulab friendly)
- Made to order — 3D printed after you buy
- Free shipping on orders over $25
- Quality checked before it ships
- Questions? Contact us · Returns
Remix info:
The original design did not fit in my stacked lack table setup and the design did not fit on my Bambulab P1P printbed, so i had to redesign the whole thing.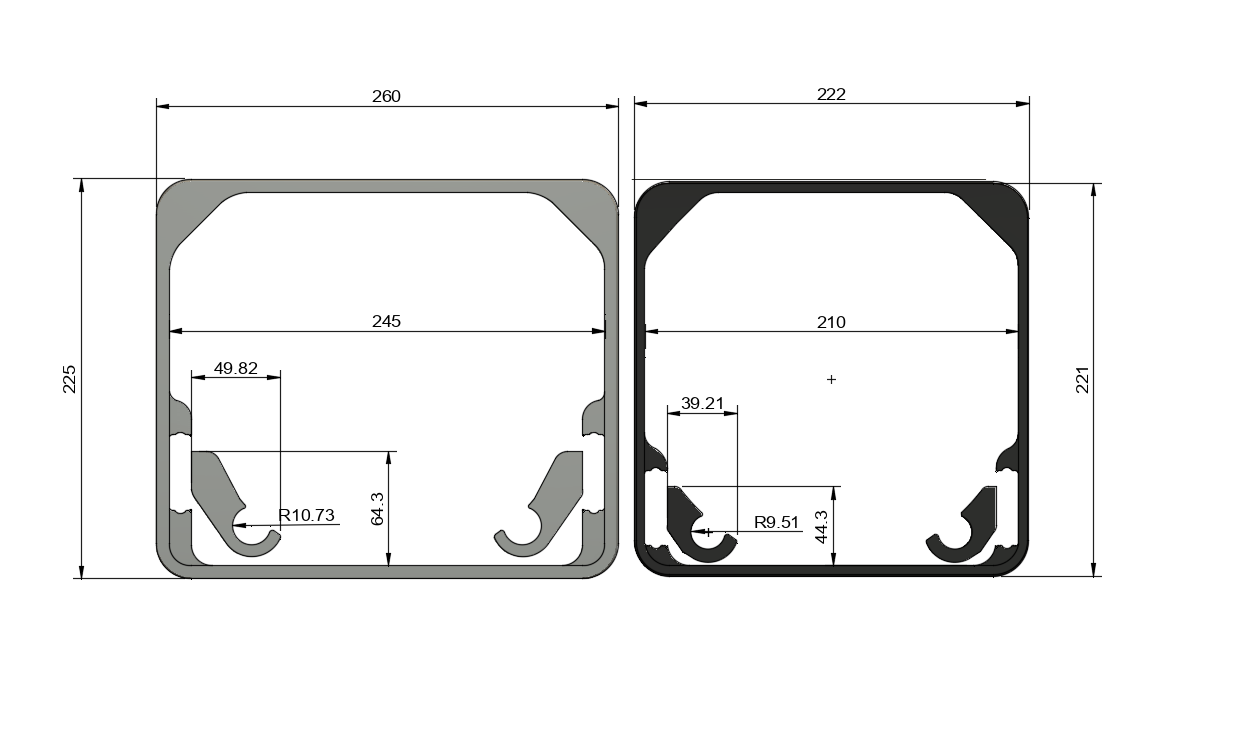
I made it a total 38mm less wide en 4mm less high (i wanted it to be square).
Because of this width difference the rails had to be lowered for there to be enough clearance.
this also had a great effect on the position of the pvc pipes and the force put on the faceplate when pulling on the drawers.
front and backplates are also redesigned to fit the new frames and to provide enough strength and stability.
underneath is the original desciption with some adjustments in parts i used.
Intro
This is a modular drawer for filament storage. Each unit can be stacked vertically and horizontally. The depth is determined by the size of drawer slides used. Check below for the list of fasteners and drawer slides that work with this design. The system uses two frame pieces attached to the drawer slides for the frame. For the drawer, it requires a front, a rear, middle supports and 3/4" PVC pipes attached to the drawer slides. The length of the PVC is the same as the drawer slides. For instance, if using a 50cm drawer slide, you would cut your PVC to 50cm.
Faceplates and Drawer Pulls
For faceplates, there are two options. A standard faceplate just 2/3rd height with 6 screw holes where you can attach a full faceplate (I'm using some finished plywood, MDF or similar would work great). A standard faceplate just 2/3rd height with 2 screw holes, and doesn't require an additional wood faceplate. You could also 3d print a faceplate to attach to either. The spacing for a drawer pull is 3" if you don't want to use the included 3d printed drawer pull. The included drawer pull accepts a 1" x 2" label, which is a common size. You can buy pre-cut labels or make your own.
Printing
All 3d printed parts should be printed out of ABS or ASA or any material that's both strong and not prone to creep. PLA will eventually sag and deform under load. It's not recommended. PETG is way too flexible and will buckle under the load of the filament. The frames are fitted for a typical build volume. i included a print profile for the parts and should be strong enough as long as you don't over thighten the screws ;).
Parts List
Here is a list of some of the parts necessary. Some of the links are affiliate links, but you can source your own if you want!
- 3/4" PVC Pipe (commonly found at every hardware store)
- GTV Touch Pro sliderails https://amzn.to/4aCgGox
- M3.5 x 8mm (14x + 4x when interconnecting) https://s.click.aliexpress.com/e/_DFObsBH
- M3.5 16mm screws (16x) https://s.click.aliexpress.com/e/_DFObsBH
- ½" Cabinet Door Bumpers (3.5mm tall, 2 per module)
Wood screws work, but you could also use thread-forming screws made for plastic. Be careful when adding fasteners, go slow and limit your torque or you could split the 3d printed parts.
Connecting and Securing
Multiple modules can be stacked vertically or horizontally. I probably wouldn't stack more than 3 high, but you can go as wide as you want. Securing the modules together makes them MUCH sturdier. There are two holes on each edge of each frame. They are designed so one edge is a through-hole and the corresponding hole is smaller for self-tapping. There are also recesses on the top and bottom of each frame. These are for silicone bumpers which act as a keying feature for stacking or for placing on a shelf.
The modules will need to be secured down to the surface, or else they could tip when extending the drawers! If you have sufficient modules connected together, it might be stable enough without securing it down to a surface, but it's still recommended.
Assembly Notes
When assembling the frames, keep the indent for the drawer slides facing forward. The area that's flush should be facing backwards. This will keep the holes for connecting multiple modules together aligned.
When assembling the drawers, press-fit the front and rear 3d printed pieces to your PVC pipes. Lay on a flat surface to make sure everything is flat before adding the bottom fasteners. Then add the middle supports and side rails for the drawer slides. Before securing the middle supports, make sure the drawer slides are parallel to each other and squared, then secure everything by screwing through the bottom hole on the middle supports into the PVC.
Always be careful with self-tapping screws into plastic. Go slow, maybe use some WD-40 or wax. If you're using a driver, make sure it's on the slower speed and has the clutch engaged, so you don't overtighten. This may slit the parts. Nothing needs to be tightened excessively, the design will keep everything aligned and tight.
Each module should use less than 500g of filament, meaning a 1kg roll can make 2 modules.
Design by Licky Lauda on MakerWorld (license: BY).