

Gimbal Cup Holder for Bag Boy Push Cart


Gimbal Cup Holder for Bag Boy Push Cart
- Made to order — 3D printed after you buy
- Free shipping on orders over $25
- Quality checked before it ships
- Questions? Contact us · Returns
This is a gimbal cup holder specifically for a Bag Boy push cart. This attaches to one of the umbrella holders on the push cart.
The cup holder on the Bag Boy push cart is great, but it doesn't fit a regular can or a mixed drink (16-ounce cup) very well, so I designed a cup holder that is better suited for this. And, to be honest, sometimes you have more than one beverage on the course. Plus, who doesn't want more cup holders?
Important Note! The knob requires the nut to be embedded into the print during the print process! I have this set up on plate 2; just follow the steps below!
The cage is removable for tapered cups like a coffee thermos
It works great for a can, with or without a coozie, as well as for a 16-ounce cup for mixed drinks.
An optional TPU bib can be printed (shown in the pictures)
Gimbal parts must be printed out of PETG.
The cup bib should be printed out of TPU.
Parts required:
Bolt: M6-1 x 70mm: qty 1
Nut: M6-1: qty 1
Machine screw: #8 x ½": qty 4
Lock Nut: #8-32: qty 4
Bib Fasteners: #6 pan head screws (wood or sheet metal screws) x 3/8" or 1/2" long.
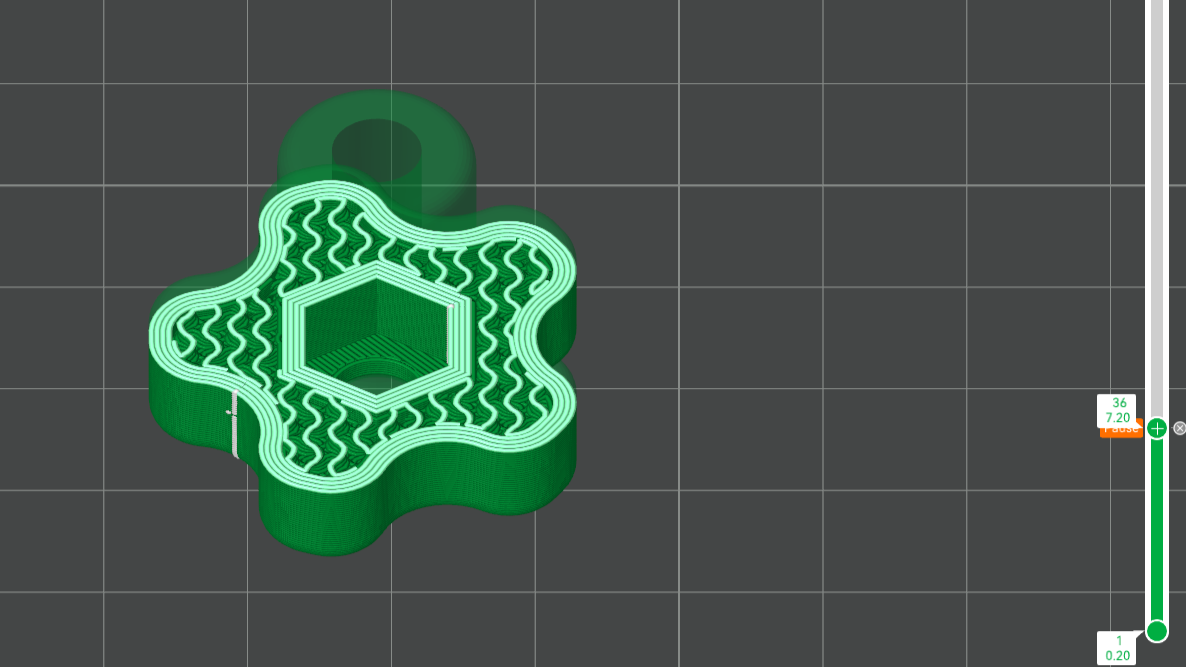
Steps to embed the nut:
- The print will pause on layer 36 (See picture)
- Gently press the nut into the cavity of the knob
- Be careful not to move the print
- Resume the print once the nut is in place
Note: Material may not lay down perfectly on the first few passes over the nut, but it will work itself out.
Assembly:
- Press fit lock nuts into the hex pockets.
- Start with the outside bracket that attaches to the cart and work your way to the smaller circle.
- Align the circular pockets (on each inside part) with the lock nuts.
- Push screws through the holes, lightly engaging the threads of the lock nut (only enough so the screw doesn't fall out.
- Use a screwdriver to thread one screw partially into the lock nut.
- Repeat this on the other side of the part.
- Tighten both screws so they are approximately one thread past the nylon of the lock nut. DO NOT OVERTIGHTEN!
- Press fit the M6 bolt into the outside bracket
- Thread the knob onto the bolt so it does not get lost.
- Insert center cage
- Bib attachment
- Push screws through bib holes
- Align with holes in smaller circle of the cup holder
- Use a screwdriver to carefully thread the screws into the part. DO NOT OVERTIGHTEN!
Check out my Patreon if you want to sell this!
https://www.patreon.com/cw/GerstlCustom
Design by GerstlCustom on MakerWorld (license: BY-ND).